5 Tips for building a Backyard Fire Pit
Problem:
So the lower half of the backyard turf always dies or goes dormant by mid-July and then fills up with weeds. My solution was to eliminate the worst section of turf in the middle and build a fire pit.
Start to finish, the project took about 20 hours of working time over 4 days. But don’t freak out, that isn’t 20 hours of back breaking labor. Most of time was spent thinking about what needed to be done, what to use, how to position the stones, and figuring out how to correct placement errors.
Tip #1 – Don’t break your back getting the materials home.
Home Depot now delivers for the same price as renting a truck for 1 hour! 20 bucks here in Raleigh. Check with your store – but I got 3000 lbs of stone for the fire pit and vegetable garden delivered to my driveway for 20 bucks + tax. It’s called Delivery by a Pro. Normally one would have to rent the truck and pay for the gas (20 dollars for an hour use of the truck+ gas at 3.40/gallon…ish) Talk about “Let’s do this!”
Note: I am not getting paid by Home Depot, but I do spend too much money at that store on the weekend.
Tools
- mattock
- several levels (short and long)
- shovel
- hand trowel
- rubber mallet
- small plastic putty knife
- 16 oz hammer
- Chicago Electric Grinder with a 4 ½” diamond cutting blade for masonry & cement
Building the fire pit
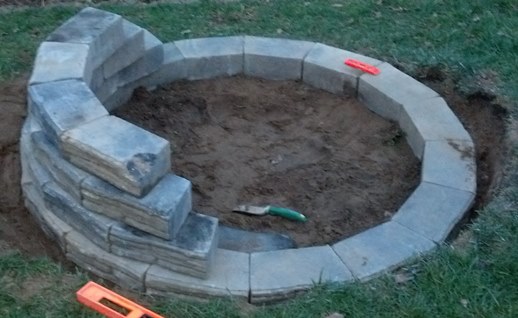
The first photo just shows the blocks placed out in the lower half of the back yard. The lower half of the yard has a small rise in the middle of the area, with the slope running down towards the fence. This rise was a pain to deal with in terms of implementing the layout.

TIP #2 – It’s much easier and faster to flatten the working surface out and then place the stones.
I sprayed a paint line around the outside to mark the dig area. I started with the lowest block. If everything is based on the lowest block, then it will be less correction time later on. But I didn’t foresee the hill crest causing misalignment. That misalignment caused my design to curve inward and not meet up in a full circle. Next time I swear I’m getting a Bobcat to level the area completely before starting.
Tip #3 – Don’t worry about time spent on the first layer.
A strong foundation will serve you well. The bottom layer will take the longest.
Using a mattock, I broke up the dirt to set for a level surface. I used sandy soil as borrow material. I’m only going 16 inches above ground level, so I am not worried about it collapsing.I got the blocks from Home Depot, part number is 280-466 if you’re interested. Using the back side of the block, because it’s flat and heavy, I pounded the placement area till flat. I placed the stone in position and added borrow material as needed. Then used a small level to check for level on each block, side to side & front to back, and level between blocks.
Tip #4 – Stack blocks evenly as you build the walls.
My Grandfather is a retired civil engineer. He loves to tell stories about how buildings weren’t built properly and would settle incorrectly. Remember his stories when you are building a fire pit. Make sure you build up the wall equally. I use a clockwise pattern building up each layer before I start the next layer. This technique will keep the weight equal and help it stay level on a hill, such as the one I built mine on.
Also, stagger your rows to add stability. Ie… Don’t line up the ends of the blocks on top of each other.
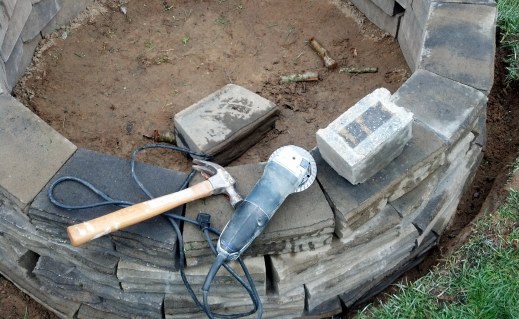
Tip #5 – Cut a block down with a grinder to fill in a gap.
Most likely, the top row will be slightly smaller diameter than the bottom row. So, you will use the same number of blocks to make the row, but the last block will need to be cut to about 2/3rds the size. I used a Chicago Electric Grinder with a 4 ½” diamond cutting blade for masonry & cement. Cost savings note: it’s much cheaper at Harbor Freight. See: http://bit.ly/1j0GNYX
I placed the block on top of the gap in the wall, marked the area to be cut with a sharpie with an X on the waste side (side not to be used). Then cut as deep into the block as the grinder would allow. I still had about 1″ of uncut cement in the center of the block. To finish separating the waste from the usable side, I placed the block on the edge of the step with the waste side exposed and struck the waste side of the block with the hammer till the block broke into 2 pieces. After smoothing the side of the block, the usable piece slid into position without issue.
This is how the pit turned out. I still have to add the gap seal sand. Note that the seal sand requires a temp above 45 degrees and no rain for 48 hours.
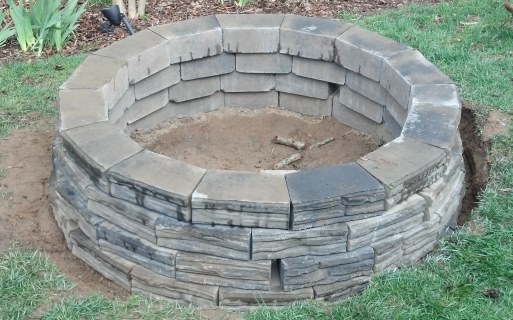
As a design feature, I will align the smaller block piece to true north and stain it darker than the rest of the blocks. That way it looks intentional.
Feel free to connect with me if you have any questions. Looking forward to the first fire with the new fire pit!
Leave A Comment